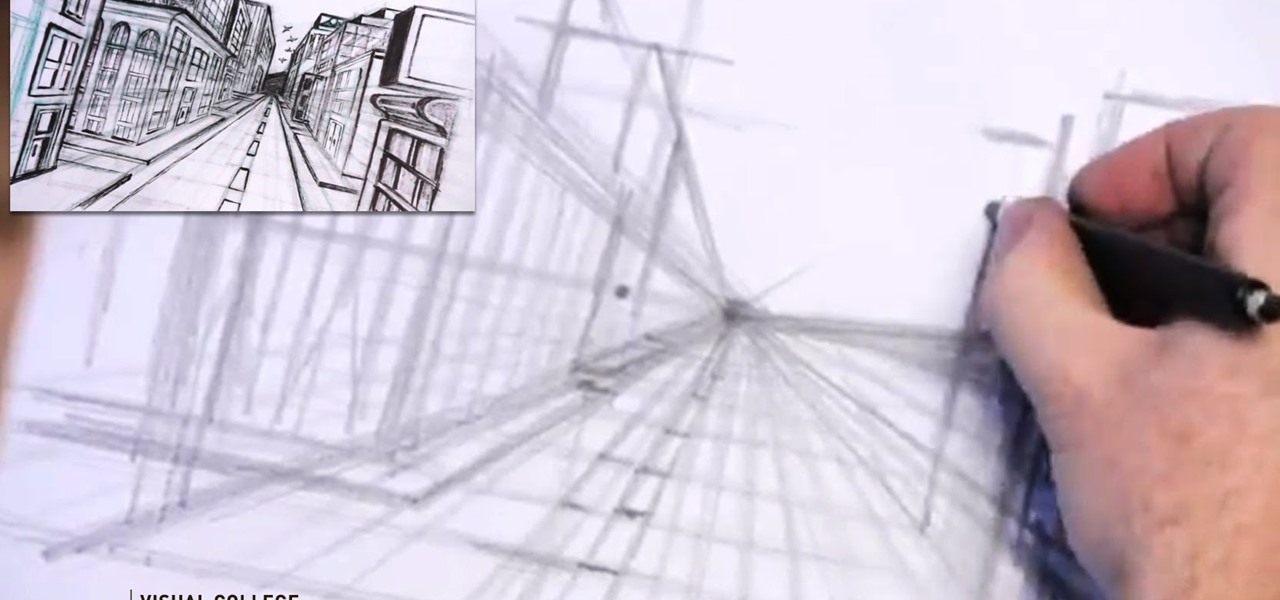
Step 1: Today We Are Going to Draw a City in One Point Perspective -- Buildings in the City Going into One Point Perspective. Let's Start Our Drawing with the Vanishing Point and Horizon Line. In Order to Get the Feel of the Drawing We Need to Determine Where Vanishing Point Will Be. Feel Free to Improvise and Change It Depending on What You Want to Achieve. Start Mapping Lines in.
Now We Need to Draw Lines That Disappear in the Distance in Order to Get the Feel of the Drawing. If You Can Draw a Rectangle in a Perspective You Can Do Anything. As Soon as We Are Satisfied with the Result We Can Start Drawing Lines from the Vanishing Point That Will Help Us to Draw Buildings and Objects in Perspective.
Let's Start Blocking a Building and Street. The Top Line Here Represents the Roof of the Building. Please Remember That Horizontal Lines Should Be Parallel to the Horizon Line. To Map Out Windows and Doors We Should Draw a Number of Vertical Lines. Everything Has to Match the Vanishing Point.
Ok, Let's Start Adding Some Details and Drawing Some Other Buildings. They Should Be of a Different Size. As Soon as We Have Blocked the Buildings We Can Move to the Other Part of the Drawing. The Same Principles Apply. We Want to Have Something in the Foreground to Add Sense of Depth to the Drawing. Please Remember That Lines in Perspective Should Hit the Vanishing Point.
Now We Can Start Adding Some Details to the Buildings on the Right Side of the Drawing. Use Rough Lose Lines to Shape the Objects. As You Are Doing That You Can Think Creatively About What to Add Next and How the Buildings and Objects Will Look Like. Let's Draw a Sign Post Here and Match It to the Vanishing Point and the Horizon Line.
Move on and Shape the Buildings in Perspective. Think About What You Want to Have in the Distance. Make the Drawing More Interesting by Pushing the Viewer's Eye Deeper into It. As Soon the Middle Ground Is Finished We Are Ready to Move on.
Ok, Let's Sit Back and Look at the Drawing First. We Need to Figure Out Where the Details Are Going to Be. We Need to Get a Feel for It. Let's Take a Pencil and Dig In. In This Stage Pay Attention to the Line Quality -- Straight Edges and Round Shapes. In Every Drawing It Is Essential to Have This Particular Combination. Draw Lines Over the Block Shapes to Start Adding Details.
Ok, Let's Try to Map Out the Sidewalk by Adding Some Details and Hitting the Vanishing Point. These New Lines Should Be Dark Enough So That When We Erase Other Lines the Details Are Still Visible. That's Why It Is Very Important to Use a Soft Pencil to Map Out Lines and Block Buildings at the Very Beginning of Your Drawing.
Let's Draw a Door Here. Use Some Round Lines and Match Them with the Vanishing Point. Move on by Adding Windows and More Doors. Add Some Details to the Top Part of the Building.
Step 2: Keep Adding Shapes and Curves to the Front Side of the Building. Match the Curves with the Lines of the Rectangle and Its Center Point. We Have Many Rough Lines to Work With. Add Shapes and Details. See, We Can Start with a Rectangle and Get the Shape We Want.
Think Creatively What Can Be Added. There Are No Limits to Your Imagination. Work Over the Rough Lines and Add Some Life to the Buildings.
Sit Back and Take a Look at What You Have in Order to Get the Feel of the Drawing. Think About How to Make Each Building Different So That the Drawing Is More Interesting. Eventually We Want to Have Something in the Background That Will Catch the Viewer's Eye.
in Case of the Buildings in the Foreground We Want to Add Some Extra Details to Make Them More Interesting. Creatively I Go Over the Graph Lines and Think What to Add. As I Am Adding Details I Match Everything with the Vanishing Point.
When Working on Details It Is Not About Adding Too Many Lines, but Making Them to Stand Out So That We Can Lead the Viewer's Eye All Through the Drawing Up to the Vanishing Point.
Let's Establish the Top of the Building in the Background. Always Keep in Mind Where the Vanishing Point and Horizon Line Is.
Step 3: Let's Mark the Front of the Sidewalk Here. We Follow the Simple Lines and Shapes by Adding Details. Add Some Birds in the Distance.
Now We Are Ready to Start Using Marker. Work on the Line Quality So That Buildings and Objects Stand Out More. Sit Back and Take a Look at the Drawing. Assess the Feel and Look of It.
with the Thicker Marker Start Adding Edges to the Building. Build Some Confidence by Doing That.
You Don't Have to Make One Straight Line; Use Short Strokes.
as You Move On. Use the Lines You Already Have and Add Some More Details. What We Should Do Is to Work on Different Buildings and Come Back Where You Started to Add and Alter Lines and Shapes. Each Building Has Its Own Character and Feel.
the First Inspiration Is the Best. That Is Why We Don't Want to Make Any Cardinal Changes. Work with What You Have, by Adding Something New and Making Some Minor Adjustments.
Step 4: Ok, Let's Take a Look at What We Can Do to Line Things Up. Some Edges Are Missing; Therefore, Let's Make Straight Edges to Match Up So That They Hit the Vanishing Point. As We Draw We Should Always Have to Keep an Eye on It.
Lines Are Not as Thick in the Background Because They Are Much Further Away. Add Some Creative Details, but Stick to the Original Plan. Get Some Contrast by Shading Details.
Let's Add More Details to the Windows That Are in the Front Part of the Building. While I'm Doing That I Think About the Creative Part of the Drawing -- What to Add.
You Have to Be Very Careful with the Edges -- Hit the Corners. You Can Make Them Lose as You Move Closer to the Vanishing Point.
Now I Will Add Details to the Building in the Back Here. I Want Them to Stand Out a Bit So That They Catch the Viewer's Eye. I Don't Want to Add Too Many Details.
We Want to Have Something in the Vanishing Point That Will Grab the Viewer's Eye Because That Is Where the Viewers Will Be Looking.
We Already Moved the Center of the Street Twice; Therefore, Let's Block It In. Draw the Lines and Hit the Edges. Make Sure They Are Not Open.
Let's Keep Drawing the Buildings on the Right Side of the Street. Outline the Buildings and Add Window Shapes.
Add Details and Increase the Pace as We Move Forward. We Want the Foreground to Stand Out. Think About the Balance of the Drawing While Doing That.
Step 5: Let's see what kind of lines we can add. It is much easier to work on the right side of the buildings because we have established details on the left side.
We don't use a ruler in these drawings.
We started with the soft pencil, moved on with a pencil of a different color and finished everything with two kinds of markers -- think and thick. Now we can erase some of the lines.
Use a thicker marker to go over the lines again. Give life to the buildings and objects we have in the drawing.
Now we can work on block shading and highlight of the drawing. While doing that think about how to make the viewer's to move towards the vanishing point. Make sure that you work on the right and left side of the drawing equally.
Add some corner shapes to create the sense of depth. Also, add some thicker lines to the buildings and objects in the foreground.
Now it is the time to add the final details to your drawing.
Just updated your iPhone? You'll find new emoji, enhanced security, podcast transcripts, Apple Cash virtual numbers, and other useful features. There are even new additions hidden within Safari. Find out what's new and changed on your iPhone with the iOS 17.4 update.














Be the First to Comment
Share Your Thoughts